Introduction
When you sign up for a hosting account on Namecheap, you may want to keep things simple by also storing your website documents with Namecheap. However, it is also possible to direct your domain name to a third-party server - ether hosted at your home, business premises or in the cloud. I will show you how you can configure your Namecheap web hosting domain, home router and dynamic DNS, in this guide on how to configure Namecheap hosting for personal web server use. This tutorial forms a small part of my larger, detailed tutorial on Running a Live Web Server on a Raspberry Pi from Home.
Configure ‘A’ Records in your Namecheap Account
If you are going to run a live server then you need a domain name for your website(s). Then you need to direct that domain name to your server. This can take some time to take effect, so let’s set this up first before we get to installing Ubuntu Server. We need to setup ‘A’ records with your hosting company and choose a static IP address for your server.
Your home broadband provider is highly unlikely to provide you with a static IP address. This is usually reserved for businesses. If you do not have a static public IP address then you will need to use a Dynamic DNS service to update the IP address assigned to your ‘A’ records, because if your IP address is changed by your broadband provider then the ‘A’ records you set up with your hosting company will cease to point to your server and you will have a lot of server downtime. This is far from ideal for a web server running live websites.
I have used Namecheap for buying my website domain names for years, as they are, first of all, cheap, have an easy to understand web interface and provide dynamic DNS software for free. Not all hosting companies provide free dynamic DNS software. Namecheap provide a dynamic DNS client that will update your ‘A’ records with your latest public IP address assigned by your ISP. Obviously, you would need to buy a domain from Namecheap to be able to use their dynamic DNS client. You are free to look elsewhere for a similar service and DNS software. This is simply the company I am familiar with and I am happy with the service they offer.
You can use this tool from Namecheap to search and buy a domain name.
Find a domain starting at $0.88
powered by Namecheap
When you have bought your domain name, login to your Namecheap account and visit the admin pages for your domain.
You will need at least one ‘A’ record. Two if you want to use both the WWW prefix and the non-WWW domain name; I.e. ‘www.yourdomain.com’ and ‘yourdomain.com’. To add these, you should visit the ‘Advanced DNS’ section for your domain. ‘_A’ records are entered under ‘Host Records’ section.
- An ‘A’ record for all hosts pointing to your server’s public IP address.
- An ‘A’ record for the WWW prefix pointing to your server’s public IP address.
The records will look something like this in Namecheap.
- A : @ : 123.123.123.123
- A : www : 123.123.123.123
The IP address is your public facing IP address. Don’t worry about inserting your real IP address yet. The dynamic DNS client we will be installing later will update your IP address for you.
To be able to visit and/or forward from a non-WWW address to one containing WWW, you need both these records. If I typed ‘ianmorrisondev.co.uk’, I would get redirected to ‘www.ianmorrisondev.co.uk’ . You can add just the one record if you want only WWW or non-WWW in your URL.
You also need to add a ‘.htaccess’ file in your Apache ‘_DocumentRoot_’ directory and enable the Apache rewrite module, so that you can setup a ‘301 redirect’ from WWW to non-WWW or vice-versa. This isn’t a necessity in this short tutorial but it does for part of my larger tutorial at Running a Live Web Server on a Raspberry Pi from Home if you find it’s a configuration you need.
Configure the Dynamic DNS Client
The dynamic DNS client will update your ‘A’ records to match your public-facing IP address of your home or business broadband. This step isn’t necessary if you are using a cloud solution. All you will need to do is add the IP address of that server to your NAemcheap account.
Download it from this page:
Namecheap Dynamic DNS Client Page
The dynamic DNS client should be run from any Windows PC on your home network. Ideally, it would run on your Ubuntu Server but I haven’t found a dynamic DNS client that works reliably on Ubuntu. Anyway, I am on my PC at least once a day, so it frequently updates my ‘A’ record on the Namecheap servers. Much more often than is really required as my public IP address is usually asssigned to me for months at the very least. You would need to find similar software if you use a Mac. Or run it in a virtual machine.
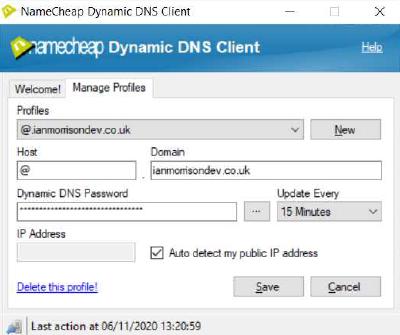
In the Namecheap dynamic DNS client, add a new profile and enter the following settings for your domain:
- Host: @ (Or ‘www’ depending on which ‘A’ record(s) you use. A seperate DNS client profile entry for each if you use both.)
- Domain: ‘ianmorrisondev.co.uk’ (Use your own domain name.)
- Password: Your_password (Can be found in the Advanced DNS section in Namecheap admin page.)
- Update every: ‘15 Minutes’ (Or longer if you prefer. You can often have the same IP address assigned to you for months.)
- Ensure ‘Auto detect my public IP address’ is ticked and save your settings.
Port Forwarding on your Router
Your hosting company should now have your public IP address registered against your ‘A’ records, which normally would correspond directly to an actual server, but as we are using our own server at our own premises, it has a local IP address assigned by your router via DHCP (or manually assigned by yourself). This means we have to redirect incoming requests to view your website to the correct computer on your network.
The first thing to do is decide which IP address you are going to use. E.g. 192.168.1.2. You can either assign this to your Raspberry Pi via DHCP or assign in manually when we install Ubuntu Server. You can even do both.
Every router is different but essentially, so I cannot provide the exact location in your router admin page to go to but we want to forward traffic on specific ports to the IP address of your server. You should login to your router’s admin page then look for an option called ‘Port Forwarding’.
By default, HTTPS connections use TCP port 443. HTTP uses port 80. We want to open both ports and whilst we are here and let’s open the SMTP mail ports too. The reason we want the mail ports open is that you will likely have some sort of contact form on website pages and this requires an open port to send email. You do not have to open them if you have no intention of sending mail but there is no harm in opening them. Let’s open two ports for email, an insecure, unencrypted, port 25, and the secure, encrypted, port 465.
Port forwarding will look something like the setup below. Remember to enter your Pi server’s internal (not public) IP address for each forwarded port. I am aware that we have not actually set up Ubuntu on your Pi yet but we will be using a static IP address, either assigned via the DHCP service of your router or manually configured in Ubuntu later. Decide the IP address you want to use and enter it here.
- Port forwarding
- Port : IP
- 80 : 192.168.1.2
- 443 : 192.168.1.2
- 25 : 192.168.1.2
- 465 : 192.168.1.2
Save these settings and leave your router’s admin page.
Conclusion
You should now be able to use a third-party server for hosting your website files. This method does add a layer of complexity to your hosting but you have the added benefit of running your own server, which you can configure as much or as little as you desire.
If you host client websites, then you can perform actions like logging how much data they use, or limit who can connect easily using your own server. I personally prefer to be in full control of my data and for that reason I like to host my own files.