Introduction
The Raspberry Pi 4 & 5 are powerful enough to run a web server to host multiple websites. At least the 8Gb version is. That’s the version of the Pi 4 I use for this very purpose. As a web designer and developer, I like to host my own websites on my own server. You can find lots of articles which give you bits and bobs of how to setup a web server but this guide is specifically tailored to guide you through not only the server setup - including Apache, MySQL, PHP, virtual hosts configuration and WordPress installation. But also how to configure your web hosting domain, home router and dynamic DNS, in this complete guide to running a live web server on a Raspberry Pi from home. It is a long and thorough guide, so save this page in your bookmarks as you may need more than one visit to work your way through everything in this tutorial.
Configure ‘A’ Records with your Web Hosting Company
If you are going to run a live server then you need a domain name for your website(s). Then you need to direct that domain name to your server. This can take some time to take effect, so let’s set this up first before we get to installing Ubuntu Server. We need to setup ‘A’ records with your hosting company and choose a static IP address for your server.
Your home broadband provider is highly unlikely to provide you with a static IP address. This is usually reserved for businesses. If you do not have a static public IP address then you will need to use a Dynamic DNS service to update the IP address assigned to your ‘A’ records, because if your IP address is changed by your broadband provider then the ‘A’ records you set up with your hosting company will cease to point to your server and you will have a lot of server downtime. This is far from ideal for a web server running live websites.
I have used Namecheap for buying my website domain names for years, as they are, first of all, cheap, have an easy to understand web interface and provide dynamic DNS software for free. Not all hosting companies provide free dynamic DNS software. Namecheap provide a dynamic DNS client that will update your ‘A’ records with your latest public IP address assigned by your ISP. Obviously, you would need to buy a domain from Namecheap to be able to use their dynamic DNS client. You are free to look elsewhere for a similar service and DNS software. This is simply the company I am familiar with and I am happy with the service they offer.
You can use this tool from Namecheap to search and buy a domain name.
Find a domain starting at $0.88
powered by Namecheap
When you have bought your domain name, login to your Namecheap account and visit the admin pages for your domain.
You will need at least one ‘A’ record. Two if you want to use both the WWW prefix and the non-WWW domain name; I.e. ‘www.yourdomain.com’ and ‘yourdomain.com’. To add these, you should visit the ‘Advanced DNS’ section for your domain. ‘_A’ records are entered under ‘Host Records’ section.
- An ‘A’ record for all hosts pointing to your server’s public IP address.
- An ‘A’ record for the WWW prefix pointing to your server’s public IP address.
The records will look something like this in Namecheap.
- A : @ : 123.123.123.123
- A : www : 123.123.123.123
The IP address is your public facing IP address. Don’t worry about inserting your real IP address yet. The dynamic DNS client we will be installing later will update your IP address for you.
To be able to visit and/or forward from a non-WWW address to one containing WWW, you need both these records. If I typed ‘ianmorrisondev.co.uk’, I would get redirected to ‘www.ianmorrisondev.co.uk’ . You can add just the one record if you want only WWW or non-WWW in your URL.
You also need to add a ‘.htaccess’ file in your Apache ‘_DocumentRoot_’ directory and enable the Apache rewrite module, so that you can setup a ‘301 redirect’ from WWW to non-WWW or vice-versa. However, later in this tutorial I will be showing you how to setup WordPress which adds its own ‘htaccess’ file, so I will demonstrate how to redirect in the Install WordPress section and setting up the rewrite module will be part of the Installing Apache and Setup Apache Virtual Hosts sections.
Configure the Dynamic DNS Client
The dynamic DNS client will update your ‘A’ records to match your public-facing IP address of your home broadband.
Download it from this page:
Namecheap Dynamic DNS Client Page
The dynamic DNS client should be run from any Windows PC on your home network. Ideally, it would run on your Ubuntu Server but I haven’t found a dynamic DNS client that works reliably on Ubuntu. Anyway, I am on my PC at least once a day, so it frequently updates my ‘A’ record on the Namecheap servers. Much more often than is really required as my public IP address is usually asssigned to me for months at the very least. You would need to find similar software if you use a Mac. Or run it in a virtual machine.
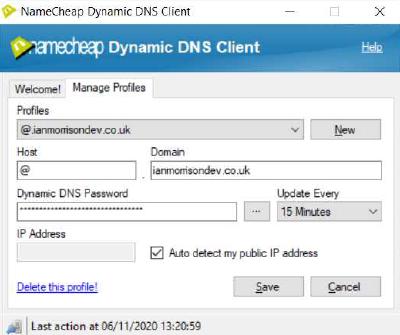
In the Namecheap dynamic DNS client, add a new profile and enter the following settings for your domain:
- Host: @ (Or ‘www’ depending on which ‘A’ record(s) you use. A seperate DNS client profile entry for each if you use both.)
- Domain: ‘ianmorrisondev.co.uk’ (Use your own domain name.)
- Password: Your_password (Can be found in the Advanced DNS section in Namecheap admin page.)
- Update every: ‘15 Minutes’ (Or longer if you prefer. You can often have the same IP address assigned to you for months.)
- Ensure ‘Auto detect my public IP address’ is ticked and save your settings.
Port Forwarding on your Router
Your hosting company should now have your public IP address registered against your ‘A’ records, which normally would correspond directly to an actual server, but as we are using the Raspberry Pi at home it has a local IP address assigned by your router via DHCP (or manually assigned by yourself). This means we have to redirect incoming requests to view your website to the correct computer on your network, i.e. you Raspberry Pi 4.
The first thing to do is decide which IP address you are going to use. E.g. 192.168.1.2. You can either assign this to your Raspberry Pi via DHCP or assign in manually when we install Ubuntu Server. You can even do both.
Every router is different but essentially, so I cannot provide the exact location in your router admin page to go to but we want to forward traffic on specific ports to the IP address of your server. You should login to your router’s admin page then look for an option called ‘Port Forwarding’.
By default, HTTPS connections use TCP port 443. HTTP uses port 80. We want to open both ports and whilst we are here and let’s open the SMTP mail ports too. The reason we want the mail ports open is that you will likely have some sort of contact form on website pages and this requires an open port to send email. You do not have to open them if you have no intention of sending mail but there is no harm in opening them. Let’s open two ports for email, an insecure, unencrypted, port 25, and the secure, encrypted, port 465.
Port forwarding will look something like the setup below. Remember to enter your Pi server’s internal (not public) IP address for each forwarded port. I am aware that we have not actually set up Ubuntu on your Pi yet but we will be using a static IP address, either assigned via the DHCP service of your router or manually configured in Ubuntu later. Decide the IP address you want to use and enter it here.
- Port forwarding
- Port : IP
- 80 : 192.168.1.2
- 443 : 192.168.1.2
- 25 : 192.168.1.2
- 465 : 192.168.1.2
Save these settings and leave your router’s admin page.
Setup Ubuntu Server on Raspberry Pi 4
Ubuntu Server is probably the most user-friendly server setup we can use on the Pi and it’s free to use. Unlike Raspberry Pi OS and other desktop Linux distributions, it is not bundled with a graphical user interface, which means more hardware resources are available to your server environment. An important factor when using a low power device like a Raspberry Pi.
Configuring a server is an in-depth project but I will break it down into digestible chunks and guide you through everything you will need to know to get a secure, stable server up-and-running and serving your live websites to the public.
Install Ubuntu Server 20.04 LTS or 21.10 Image
The latest versions of Ubuntu are designed to work with the Raspberry Pi. This makes the setup much easier. You simply copy the image to SD card using an imaging application, such as Balena Etcher and you are good to go.
You can download the images from the Ubuntu website. Make sure to get the version made for computers with Arm processors.
Then install Balena Etcher from here.
Installing the image is as simple as selecting your downloaded image, then selecting the destination drive, e.g. SD card, and flashing.
It is possible to copy your image to a USB SSD and boot from USB but you would need to install Raspberry Pi OS on an SD card first and follow the instruction on the Raspberry Pi website for setting up USB boot.
The configuration method has changed since the Pi 4 was first released, so it is safest to check the lastest method used on their website.
If you choose to boot your Raspberry Pi 4 from USB, I would not recommend using Ubuntu Server 20.04. There are some changes you have to make to the configuration within Ubuntu to allow it to USB boot but these changes get overwritten during Ubuntu kernel updates, rendering your server unbootable. You can reconfigure the server each time an update occurs and get it working again, which is fine if you are using the server for local development only. However, having a server become unbootable is not ideal for a live production server. For this reason, I recommend Ubuntu Server 21.10 if you choose to install on to a USB drive. You can always upgrade to the next Long Term Support (LTS) server version when it becomes available, as this should also support USB boot, as version 21.10 does.
When you first boot your server, login with the default username ‘ubuntu’ and password, which is also ‘ubuntu’. You will then be asked to set a new password. Do so, login, and then move on to the next step.
Update Ubuntu Software Sources and Applications
You first want to upgrade your software sources list and then install the latest versions of all software currently installed. Typing ‘sudo’ before each command gives you superuser permissions and allows you to make changes to protected areas of the operating system. You will receive a password prompt for your admin password when elevating permissions in this way for some actions.
sudo apt update && sudo apt upgrade -y
Usually, you do not have to restart after and update but if you do ever need to restart the server you can type:
sudo shutdown -r now
If you want to shutdown your server when taking a break from this tutorial then type:
sudo shutdown now
Set a Static IP Address
As mentioned in previous sections, it is necessary to use a static IP on your server. Let’s examine this in more detail now that we are setting up Ubuntu Server. Assigning a static IP address can be done in one of two ways.
The first method is to use DHCP on your home router. Using this method, you would assign a specific IP address to the MAC address of your Raspberry Pi network adapter, either the WiFi or wired connection and your router will reserve and automatically assign the chosen IP to your Pi on every boot. I prefer to use a wired connection as it is more stable and less can go wrong. Every router is different, so you should check out the instructions for your router, although it is fairly straightforward to setup.
To get your MAC address in Ubuntu, simply type:
ip addr show
You can take the MAC address here and return to your router configuration to enter it if you want to assign your IP address using DHCP. Either selct the MAC address for eth0 or wlan0, depending on whther you decide to use a wired or wireless connection. The MAC address will be six pairs of hexadecimal values separated by colons. E.g. xx:xx:xx:xx:xx:xx.
You can also assign the IP address manually within Ubuntu Server, which is my preferred method. To do so, first identify the name of your network interface. Again this is likely to be ‘eth0’ or ‘wlan0’ but to be sure type:
ip link
Now you need to edit the file that holds you network interface information. The name of this file can vary from system to system. You can list the contents of the directory where the file resides by typing:
sudo ls /etc/netplan
On Ubuntu Server 20.04, the file name appears to be ‘50-cloud-init.yaml’. Let’s edit this file.
sudo nano /etc/netplan/50-cloud-init.yaml
Then change the file contents to the same as below, entering the details of your home network that were displayed in the previous commands. The IP address will be the static address of your choosing. If you are still unsure what your network settings should be, you can either check your router settings via your router’s admin page. Or if you are on Windows you can type this command from the command line:
ipconfig /all
Your edited file should look like this.
network:
    ethernets:
        eth0:
            dhcp4: no
            addresses:
            - 192.168.1.2/24
            gateway4: 192.168.1.1
            nameservers:
                addresses: [192.168.1.1]
            optional: true
    version: 2
This is a YAML file which requires you to indent the lines according to YAML standards, so make sure you indent the lines properly under your adapter name. Also, you can have more than one IP address, which is why the addresses are indented underneath their name. However, you only need one IP address to get your server working.
Press CTRL+O to save and CTRL+X to exit the editor.
Apply the changes by typing:
sudo netplan apply
If you have jumped ahead and are remotely connecting to your server at this point, you will lose your connection and will have to reconnect using the new IP address (if different). Then you can move on to the next step.
Verify the changes by typing:
ip addr show dev eth0
Or if using the WiFi connection:
ip addr show dev wlan0
The output should show you newly assigned static IP address.
Remotely Connect to Ubuntu Server via SSH
Now that a static IP address is assigned to your server it is a good idea to remotely connect to it using SSH. I use the Putty client in Windows for this purpose. This means you can work on your server without it being connected to a monitor or keyboard.
SSH should be enabled in Ubuntu already, so we just need to install Putty on our other machine. I use Windows but there is a Unix version of Putty that should run on Linux and Mac. Get Putty here:
When installed, you simply enter your Ubuntu Server IP address under ‘Host Name’ and ensure ‘SSH’ is selected and click ‘Open’. You will be prompted for your usual username and password.
Set the Correct Ubuntu Server Timezone
Ubuntu should be running with the correct time zone set for where your server is located. Let’s ensure your timezone is correct.
You can check what your timezone is currently set to by typing:
timedatectl
If it looks incorrect then you need to find out the correct syntax for your timezone by typing:
timedatectl list-timezones
If you wanted to set your timezone to London, for example, you would enter:
sudo timedatectl set-timezone Europe/London
That’s it! Your timezone will be correct.
Installing Apache
Apache is the web server software we will use. This should be installed first.
sudo apt install apache2 -y
Setup Apache Virtual Hosts
We will be setting up this web server to be capable of hosting more than one website/domain. To enable this functionality, we will use a feature called Apache virtual hosts.
In theory, you could have as many websites on your server as you like. In reality, how many websites you can host is determined by the bandwidth of your internet connection, traffic to your website and the power of your hardware.
I will show you how to create a single virtual host and you can duplicate the process for each website you want to host.
I will be using full, absolute file paths throughout this tutorial, so that you always know exactly where to edit and copy files to but you can change into subdirectories and use relative paths if you prefer.
First, we are going to create a directory structure for our virtual host. It is best to use your website domain name as the virtual host directory name. This allows for easy identification of each website hosted on your server. I am using my own website ‘ianmorrisondev.co.uk’ as an example. Change this to your own domain name wherever it appears in the remainder of this tutorial.
sudo mkdir /var/www/ianmorrisondev.co.uk
Then we create a directory below this to hold our website files. This directory is known as the ‘Document Root’ of our website.
sudo mkdir /var/www/ianmorrisondev.co.uk/public_html
Finally, I like to store separate log files for each website on my server, so we need to make a directory for these to live in. Using this method, I can easily look up the error and access log data for individual client websites, rather than have to scroll through a massive log file with many logs from many different websites mingled together.
sudo mkdir /var/www/ianmorrisondev.co.uk/logs
Whilst we are creating the directory structure, let’s create a test webpage index file in the virtual host ‘Document Root’ directory using the Nano text editor.
sudo nano /var/www/ianmorrisondev.co.uk/public_html/index.html
Insert a basic webpage HTML into the file. I find it is best to at least say the name of the virtual host in this file rather than some generic information. This way you know you have connected to the correct virtual host. Later, when we setup PHP, I will show you how you can add PHP configuration information to this file. But for now just enter something simple.
<html>
    <head>
        <title>Welcome to ianmorrisondev.co.uk</title>
    </head>
    <body>
        <h1>Success! The ianmorrisondev.co.uk virtual host is working!  </h1>
    </body>
</html>
Change ownership of the website directory and its content from the root user to the Apache user.
sudo chown -R www-data:www-data /var/www/ianmorrisondev.co.uk
We will be doing a more in-depth file and directory ownership tutorial later when we get to installing WordPress, but for now this will suffice.
Now that we have created a website, we have to configure and enable the virtual host within the Apache configuration.
Apache comes with a default virtual host file. We will copy this and use it as the basis of our new virtual host for our website.
sudo cp /etc/apache2/sites-available/000-default.conf /etc/apache2/sites-available/ianmorrisondev.co.uk.conf
We then make changes to out new virtual host using the nano editor.
sudo nano /etc/apache2/sites-available/ianmorrisondev.co.uk.conf
Edit your virtual hosts file to look like this.
ServerAdmin your_email@gmail.com
ServerName ianmorrisondev.co.uk
#ServerAlias www.ianmorrisondev.co.uk
DocumentRoot /var/www/ianmorrisondev.co.uk/public_html

ErrorLog /var/www/ianmorrisondev.co.uk/logs/error.log
CustomLog /var/www/ianmorrisondev.co.uk/logs/access.log combined

<Directory /var/www/ianmorrisondev.co.uk/public_html>
    Options Indexes FollowSymLinks MultiViews
    AllowOverride All
    Require all granted
</Directory>
Press CTRL+O to save and CTRL+X to exit the editor.
The first section sets up the name of your virtual host domain and its location on the server filesystem. Plus, you can add the email address of the website administrator. The ‘ServerAlias’ line is optional. If you only want your domain to be reachable without using the prefix WWW then you can remove this or comment it out with a hash symbol as I have done here. Alternatively, if you want to use WWW then enter the domain with that prefix under server name or the alias if you want to use both. We will also set up a redirect when we get to installing WordPress so that you can redirect users from WWW to non-WWW and vice-versa.
The second section is where we set up the log files for this website into their own individual files, as mentioned earlier.
The third section is setting up permissions on the website. These can vary but these are the settings I use.
You can check for any syntax errors by typing:
sudo apache2ctl configtest
It likely you will get an error that states - ‘Could not reliably determine the server’s fully qualified domain name’. We can set a global server name to fix this error.
sudo nano /etc/apache2/apache2.conf
Then add this line at the end of the file enter:
ServerName 127.0.0.1
You can learn much more about the options you can use from the Apache official documentation.
Activate the New Virtual Hosts File
The ‘a2ensite’ tool is used to activate virtual hosts.
sudo a2ensite ianmorrisondev.co.uk
With our new site enabled, we should disable the default website.
sudo a2dissite 000-default.conf
Enable the ‘rewrite’ mod.
sudo a2enmod rewrite
Then restart Apache to allow changes to take effect.
sudo systemctl restart apache2
Or if you have any issues restarting Apache, do a full system restart.
sudo shutdown -r now
Testing the Virtual Host by Modifying the Local Hosts File
If you have followed this tutorial from the start then you should be able to visit your website via a browser and see the test page we created. If you have not yet set up your domain to point to your webserver with whomever you purchased your domain name from, then you still will not see if your virtual host is active yet.
If this is the case, we can temporarily test this locally by editing the ‘hosts’ file on a computer you are using.
On Linux or a Mac you can edit the ‘hosts’ file by typing:
sudo nano /etc/hosts
On Windows the file is located here:
C:\Windows\System32\drivers\etc\hosts
It requires administrator privileges to edit. I tend to keep a copy of this file outwith this directory and I simply edit it and paste it over the existing file. This doubles as a working backup.
Add this to the file:
192.168.1.2 ianmorrisondev.co.uk
Where the IP address is the address of your server and replace my domain name with your own. You can get your computer IP address by typing ‘ifconfig’ on Mac, ‘ip addr show’ on Linux, or ‘ipconfig’ from the Windows terminal.
On that same computer, you should now be able to browse to your website domain and see the test page we set up earlier. If you get an error then double-check the spelling within the virtual host configuration file we created earlier, fix any errors and restart Apache.
If you use your PC for developing websites then there is no reason why you can’t use this local virtual host rerouting method for developing websites that can be viewed in the web browser using proper domain names or even test names, e.g. example.test. This is what I do when building websites and it works great.
Be aware, if you want to see a live version of this site (if you have one) or configure an SSL certificate for this website then you should disable the redirect in your local machine virtual host file first. It is easy to forget you are not actually looking at a website that is being sent across the internet and is actually being served locally.
The website we just setup is an unencrypted website, which is fine for working on locally, but on a live site, you should use an SSL certificate. I use the Let’s Encrypt service to get free SSL certificates for my sites. But before you can do this, you have to set up records with your web host to point your domain to your home server and configure port forwarding on your router. If you have not done that already then refer to the earlier sections of this tutorial.
Configure SSL
The first step is to install the software required to get an SSL certificate from Let’s Encrypt.
sudo apt install certbot python3-certbot-apache
With the Certbot software installed, we can now generate a new SSL certificate for our website(s).
sudo certbot --apache
You will be asked a series of questions and asked to provide your email address.
The Certbot software will use the virtual host configuration file we set up previously, so make sure that is working before continuing. If you have multiple websites then you can generate SSL certificates for each site, based on their own configuration file. Or you can select the option to install a certificate for individual sites if you prefer.
The options presented by Certbot are all fairly self-explanatory. The one option you probably want to set is SSL redirection. This means that if someone visits the HTTP (insecure) version of your website, they will be redirected to the HTTPS (secure) site.
Certbot creates an additional virtual host configuration file for the secure connection based on your existing configuration file and adds additional entries to both of these configuration files. If you ever need to delete your certificate you would also need to remove the additional lines from the configuration and delete the SSL configuration file before typing:
sudo certbot delete
Then select the certificate you want deleted.
But for now, you should now be able to visit your domain in your browser using the HTTPS prefix. E.g. https://www.ianmorrisondev.co.uk.
If you are having problems getting a certificate issued, you should double check your ‘A’ records are setup correctly with your web hosting company. Check your Dynamic DNS is working and updating your ‘A’ record(s) IP address. Check you have port forwarding setup correctly on your home router. Finally, if you have setup a local redirect in your host file, disable it.
Auto-renew SSL Certificates
Certbot sets a cron job when that automatically renews certificates if they are due to expire within 30 days. You can check the current status of this service by typing:
sudo systemctl status certbot.timer
Or list all the timers currently running. Within this you should see the Certbot service.
sudo systemctl list-timers
If you would like to test the automatic renewal of your certificates, you can run this command:
sudo certbot renew --dry-run
The cron jobs for automatically renewing the certificates can be viewed in these locations.
/etc/crontab/
/etc/cron.*/*
You can also force a manual certificate update with this command:
certbot -d ianmorrisondev.co.uk --force-renewal
Your SSL certificates should now be setup and automatically renewing.
Install MySQL
We will use MySQL as our database server. A database will be required for our WordPress installation, so let’s install MySQL.
sudo apt install mysql-server -y
sudo mysql_secure_installation
Select ‘y’ to enable strong password component. This ensures that only strong passwords can be used in MySQL for stronger security.
Select ‘2’ for strongest password and enter your password, following the guidelines on-screen. This will be your MySQL root user password.
Type ‘y’ for remaining questions.
Test by starting MySQL:
sudo mysql
Type ‘exit’ to exit MySQL prompt.
Install and Configure PHP
We need to install the PHP libraries. WordPress also requires these.
sudo apt install php libapache2-mod-php php-mysql -y
To check PHP has installed and which version it is type:
php -v
Take note of your version as it may change the path used in the next command. Open up your PHP settings file by entering:
sudo nano /etc/php/7.4/apache2/php.ini
Note: This is the path for PHP version 7.4. Change path to whatever version you use. If in doubt, you can list the PHP directory names within the ‘/etc/php’ directory by typing:
sudo ls /etc/php
This will show all PHP version folders. You usually want to use the latest.
Change the following values to those shown in your ‘php.ini’ file for correct WordPress configuration. You can configure many PHP settings but the changes below are needed if you are using WordPress. Adjust to suit your own needs and server hardware.
Rather than scroll through this very long file, you can search for particular text by pressing ‘CTRL+W’ and entering the search term.
- upload_max_filesize = 512M
- post_max_size = 512M
- memory_limit = 256M
- max_execution_time = 600
- max_input_vars = 3000
- max_input_time = 1000
I make the ‘upload_max_filesize’ and ‘post_max_size’ large sizes because I work with large, full website imports in WordPress, so this is required for my usage. You may only need a much smaller size.
Note: With ‘max_input_time’, you can if you prefer, set this to ‘-1’ which means ‘max_execution_time’ is used instead. Both should work fine. In the ‘php.ini’ file, it is suggested that setting it to ‘-1’ means its time is unlimited but the PHP documentation states that entering ‘0’ is for unlimited and ‘-1’ is for using the ‘max_execution_time’ value. Trust what it says in the official documentation from the PHP website rather than file comments.
You can view your PHP settings in the browser. If you edit the test ‘index.html’ file we created earlier in your ‘DocumentRoot’ directory.
sudo nano /var/www/ianmorrisondev.co.uk/public_html/index.html
Add the following PHP code to it.
<?php phpinfo() ?>
Then rename your index file with a PHP extension.
sudo mv /var/www/ianmorrisondev.co.uk/public_html/index.html /var/www/ianmorrisondev.co.uk/public_html/index.php
Now when you open up your website in a browser you will see the PHP Info test page where you can check your settings. If you notice that your personalised settings are not taking effect then check for typos and restart your server.
Install WordPress
Many websites are built using WordPress. You do not have to use WordPress but I’ll show you how you can install WordPress and configure your installation for seamless operation.
First, we still have our test website page in this directory, so let’s rename it or it will be displayed instead of our WordPress website.
sudo mv /var/www/ianmorrisondev.co.uk/public_html/index.html /var/www/ianmorrisondev.co.uk/public_html/index.bak
Or delete the file altogether.
sudo rm /var/www/ianmorrisondev.co.uk/public_html/index.html
I prefer to keep the file as it can be used to display maintenance messages if you are doing any server work. You would simply rename it back to its original filename.
Next, you want to download the latest WordPress distribution to your virtual host ‘DocumentRoot’ directory and change the downloaded file name to ‘wordpress.zip’. Change the directory path to match that of your domain name that you setup earlier.
sudo wget -O /var/www/ianmorrisondev.co.uk/public_html/wordpress.zip http://wordpress.org./latest.zip
We need to extract the downloaded file with the ‘unzip’ utility. Download this.
sudo apt install unzip
Extract the WordPress zip file.
sudo unzip /var/www/ianmorrisondev.co.uk/public_html/wordpress.zip -d /var/www/ianmorrisondev.co.uk/public_html
The files will now be unzipped into a directory named ‘wordpress’ in your virtual host ‘DocumentRoot’ folder. Let’s move the files out of the ‘wordpress’ folder and into your ‘DocumentRoot’ folder.
sudo mv /var/www/ianmorrisondev.co.uk/public_html/wordpress/* /var/www/ianmorrisondev.co.uk/public_html
You can remove the setup folder and zip file if you wish.
sudo rm -r /var/www/ianmorrisondev.co.uk/public_html/wordpress
sudo rm /var/www/ianmorrisondev.co.uk/public_html/wordpress.zip
Now, if you visit your website in a web browser you should see the initial WordPress setup page but before we can configure it we need to set up a database.
Configure a MySQL Database for WordPress
WordPress requires a database to save all your webpage data, blog posts, comments, plug-ins, etc. Whilst we could use an application such as PHPMyAdmin to create your database and configure users, it is actually not required. We can do a few simple steps from the command line and we’ll be up-and-running much quicker.
First, log in with your MySQL root user and password we set up earlier.
sudo mysql -u root -p
Your command prompt will change to ‘mysql>’ to indicate that you are now using MySQL rather than the system unix command terminal. We can now issue MySQL commands.
When naming the database, it is wise to not use a name that is easily guessable by a hacker. I usually add some random characters as a prefix and/or suffix (postfix). Something like the following will create a new database:
CREATE DATABASE wp_ianmorrisondev_7fh3u5 DEFAULT CHARACTER SET utf8 COLLATE utf8_unicode_ci;
Confirm you have successfully created the database by typing:
SHOW DATABASES;
A new SQL user needs to be set up and that user should be given full access rights to your newly created WordPress database. For added security, never give this same user access to other databases on your server. Create a new user for each new database for a website and ensure you give them a random password and a non-standard name, for example, do not call your user ‘admin’, ‘main’, etc. Again, consider using a prefix or suffix.
Issue this command to create a new MySQL user. Change the database name and user name as appropriate. Include numbers and special characters in your password as MySQL expects this for added security.
CREATE USER 'you_new_user'@'localhost' IDENTIFIED BY 'your_random_password';
We need to assign this user privileges to your database. In the following example, we are giving the new user full access to the database, including structural changes. This is because some plugins and WordPress upgrades require more than read and write access. This is not ideal and you probably would not allow this under normal circumstances but for the seamless operation of WordPress, it’s required.
GRANT ALL PRIVILEGES ON wp_ianmorrisondev_7fh3u5.* TO 'your_new_user'@'localhost';
Finalise permission changes by reloading all permissions.
FLUSH PRIVILEGES;
Exit MySQL command line by typing:
Exit
WordPress Admin Initial Setup
With your database setup, we can now configure WordPress.
We need to edit the WordPress configuration file that handles the connection to the database we just setup.
First, copy the sample configuration file.
sudo cp /var/www/ianmorrisondev.co.uk/public_html/wp-config-sample.php /var/www/ianmorrisondev.co.uk/public_html/wp-config.php
Next, edit the newly created configuration file.
sudo nano /var/www/ianmorrisondev.co.uk/public_html/wp-config.php
Add your MySQL connection details that you setup earlier - The database name, username, and password. For example:
define( 'DB_NAME', 'wp_ianmorrisondev_7fh3u5' );

define( 'DB_USER', 'username_you-setup' );

define( 'DB_PASSWORD', 'password_you_setup' );
It’s a good idea to not use the default table prefixes for added security. Modify this, as we did with the database name, by including a random prefix. For example:
$table_prefix = 'wp_j6x9w4_';
As your database and web server are on the same computer, we can leave the ‘Database Host’ set to ‘localhost’. You would set this to another host if you ran your database on a different server.
define( 'DB_HOST', 'localhost' );
Now visit your homepage in your browser and you should see the WordPress initial install page. You should complete the following fields.
- Database Name
- Username
- Password
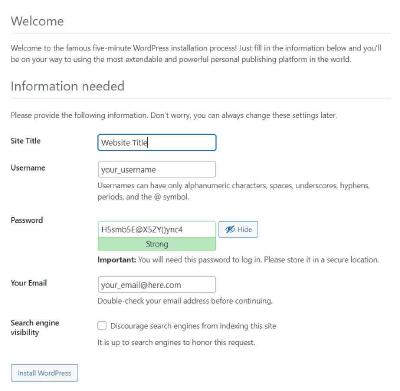
On this page, you can enter a title. This can be a plain text name and not your actual URL. Your site title can be changed in WordPress admin at any time, so don’t worry too much about its name if you are unsure about the title you want to use on your website.
Enter the login details for accessing the admin section of WordPress. Note: This is an entirely separate login from MySQL and you can enter new details here, solely for WordPress access.
You also have the option to discourage Google and other search engines from indexing your website. Leave this unticked unless you have a good reason to not want your website to be found by search engines.
Click the ‘Install WordPress’ button and allow WordPress complete to setup.
After roughly a minute, you should be able to login to the WordPress admin section of your website with the username and password you created above.
Enable PHP Modules Required by WordPress
WordPress requires specific PHP modules to function correctly, so let’s see which modules are required. WordPress actually informs us which modules are missing.
When you login to your WordPress admin page, visit ‘Tools’ > ‘Site Health’ and examine the critical issues that appear. We are informed of the following missing modules, although one module, imagick, isn’t actually required, so we’ll ignore that. The following modules need to be installed and enabled.
- curl
- dom
- mbstring
- zip
- gd (gd2)
- soap
- xmlrpc
First, ensure the extension files are installed on your system.
sudo apt install php-curl php-gd php-mbstring php-xml php-xmlrpc php-soap php-intl php-zip -y
Let’s head back into our PHP configuration file to enable them.
sudo nano /etc/php/7.4/apache2/php.ini
Search for the section ‘Dynamic Extensions’, where you will see a list of modules. Uncomment each of the modules listed above and press CTRL+O and CTRL+X to save and exit.
Restart Apache for changes to take effect.
sudo systemctl restart apache2
If you refresh your page in WordPress, you should see that the module errors have disappeared.
Change Directory Ownership and Permissions
Another error may appear in WordPress regarding the inability to update you WordPress installation unless you are using an FTP user for updates. This is a file permission issue in your virtual host ‘DocumentRoot’. We can fix this by assigning your ‘DocumentRoot’ directory to the user Apache web server runs as.
sudo chown -R www-data:www-data /var/www/ianmorrisondev.co.uk/public_html
If you want to apply this to all your virtual hosts, simply apply it to the ‘WWW’ directory recursively. This is the directory that holds all your virtual hosts. Two levels higher than the above example.
Then we need to run two ‘find’ commands to set the correct permissions on the WordPress directories and files. These can be either be set with the values ‘750’ or ‘755’ for directories and ‘640’ or ‘644’ for files. Some plugins may not run correctly if you set the more secure method of ‘640’ and ‘750’. Adjust the values to ‘755’ and ‘644’ if that is a problem you experience.
sudo find /var/www/ianmorrisondev.co.uk/public_html -type d -exec chmod 755 {} \;

sudo find /var/www/ianmorrisondev.co.uk/public_html -type f -exec chmod 644 {} \;
Again, apply this to either your virtual host directories individually or to your ‘/var/www’ directory to apply changes to all websites.
Refresh the WordPress page and the error should be gone.
You can view your file ownership and permissions by typing:
sudo ls -l /var/www/ianmorrisondev.co.uk/public_html
Configure ‘.htaccess’ File
With WordPress installed, we can go ahead and make some changes to the website’s ‘.htaccess’ file. In this instance, we will be setting up redirects for your domain name, either WWW to non-WWW, e.g. ‘www.ianmorrisondev.co.uk’ to ‘ianmorrisondev.co.uk’, or vice-versa. We can also setup a redirect from HTTP to HTTPS but that should have been setup by Certbot when you installed your SSL certificate. However, there is no harm in adding that particular redirect to your configuration just to be certain.
These redirects require the Apache rewrite module that we added earlier, so if you run into problems then ensure you have not forgotten to install that module.
Access your website configuration file by entering:
sudo nano /var/www/ianmorrisondev.co.uk/public_html/.htaccess
Then add the section(s) applicable to how you have configured your virtual host. Ensure you do not type these changes within the WordPress section, as indicated by the warning in the ‘.htaccess’ file.
Non-WWW to WWW
Did you configure your website with or without a WWW prefix? E.g. ‘www.yourdomain.com’ or ‘yourdomain.com’. You can redirect from one to the other, so that your website uses a consistent URL and visitors are not refused access by either adding or removing the prefix in the address bar of the web browser.
RewriteEngine On
RewriteCond %{HTTP_HOST} !^www\.
RewriteRule ^(.*)$ http://www.%{HTTP_HOST}/$1 [R=301,L]
WWW to non-WWW
RewriteEngine On
RewriteCond %{HTTP_HOST} ^www\.(.*)$ [NC]
RewriteRule ^(.*)$ http://%1/$1 [R=301,L]
HTTP to HTTPS
All live websites should be using HTTPS. I have shown you how to setup SSL certificates for free, so there should be no excuse to not use HTTPS. This is how you can redirect from HTTP to HTTPS.
RewriteEngine On
RewriteCond %{HTTPS} !=on [NC]
RewriteRule ^(.*)$ https://%{HTTP_HOST}%/$1 [R=301,L]
Disable Directory Listing
If your website did not contain the necessary files to render a webpage, e.g. ‘index.php’ or ‘index.html’ Apache server would show a listing of all other files and directories stored in your ‘DocumentRoot’. You should not disable directory listing when using WordPress but you might need to with other types of website where it is best to hide the files and folders for security purposes.
Options -Indexes
If you do not use WordPress then you can add an ‘.htaccess’ file manually to your website and still use these redirects. Just type:
sudo nano /var/www/ianmorrisondev.co.uk/public_html/.htaccess
This will create a new file that you can edit.
Improving Security in Ubuntu Server
Your server should now be usable and you can serve live websites from it. However, when running a live web server, it is usually a good idea to put some effort into improving security. There are a few reasonably simple steps you can take that will reduce your chances of getting hacked.
Install and Configure a Firewall
We will install the Uncomplicated Firewall (UFW) package for additional protection on your server. This will allow us to only allow connections via ports we specify.
UFW is usually installed by default but to be sure, try installing using this command:
sudo apt install ufw -y
By default, UFW allows all outgoing connections from the server but denies all incoming connections. Let’s enable those defaults before we do anything else.
sudo ufw default deny incoming

sudo ufw default allow outgoing
Don’t worry about blocking your connection if you are remotely working on your server. We need to activate the firewall before that will happen. Before we activate UFW we should state which types of services should be allowed to make incoming connections to the server.
A full list of network services can be viewed in this file:
sudo nano /etc/services
View help for UFW by typing:
sudo ufw --help
SSH is the service that allows you to connect to your server remotely. we can see from the file that SSH runs on port 22. Let’s allow SSH incoming access.
sudo ufw allow ssh
You could also have typed:
sudo ufw allow 22
But as we are using the default SSH port, UFW understands the first command without an actual port number specified. If you wanted to change your port number you could do so but you would need to use the second command that opens the port number you specify. Stating the service name will not work.
We want to open additional ports for web server and send mail services, so that any website contact forms cam actually send mail - HTTP (Port 80), HTTPS (Port 443), SMTP (port 25) and SMTPS (port 465). Again, we are using the default port numbers, so there is no need to specify the actual number, just the network service names. In addition, a web server can have problems if its time is inaccurate, so I like to open the ‘timserver’ on port 37.
sudo ufw allow http

sudo ufw allow https

sudo ufw allow smtp

sudo ufw allow smtps

sudo ufw allow timserver
Now enable your firewall.
sudo ufw enable
You can view the list of open ports.
sudo ufw status
You should see all the ports above listed as open. The list might be repeated. This is because the ports are open for both IP addressing version 4, which is how we have set up our server, but also for IP addressing version 6. This is fine.
The only other services you may need to open on your server are FTP or SFTP for transferring files. I personally do not bother as I simply map a drive to my home PC on the rare occasions I need to transfer files and copy them over from Windows. This feels more secure than allowing remote file transfers, which is completely unnecessary when running a server at home.
If someone is repeatedly attacking your server you can block them manually based on their IP address.
sudo ufw deny from 123.123.123.123
If you would like to delete a rule you first have to list them by number.
sudo ufw status numbered
Then you can select which rule you want to remove.
sudo ufw delete 3
If you want to remove all rules and start over you can reset everything.
sudo ufw reset
There are many more options with UFW but these are all you need to get your server running and secure. Check out the official documentation if you would like to delve deeper.
Brute Force Attack Protection using Fail2Ban
Fail2Ban is a useful tool for protecting Linux systems from brute force attacks over SSH that attempt to login to your server. It blocks attackers who repeatedly try to access your server by blocking their IP address for a period of time.
Install Fail2ban by typing this command:
sudo apt install fail2ban -y
Check the Fail2ban service is running.
sudo systemctl status fail2ban
We want to make a copy of the default configuration file and use the newly created file for our configuration.
sudo cp /etc/fail2ban/jail.conf /etc/fail2ban/jail.local
Open the new configuration file in your editor.
sudo nano /etc/fail2ban/jail.local
If you use a local machine to SSH into your server, you want to ensure this machine is never banned. We will add our local IP address to the ignore list.
We will uncomment the relevant lines but be careful to uncomment the lines meant for configuration and not the lines which are simply comments describing these options. The second set of lines is what we want.
Uncomment out the line below and add any local IP addresses, separated by a space, to this line. Or you can allow a range of IP addresses on your home network, as I have done here. I am allowing all IP addresses from 192.168.1.0 to 192.168.1.255. This way I can log in to my server from my desktop, laptop, or phone whilst on my home network.
If you are unsure about networking, this is known as CIDR notation. You can search Google for a CIDR calculator to help you work out your range. Make sure you use the correct Subnet Mask for your network whilst calculating. If you are still unsure then you can simply type in your exact, singular, local IP address without using CIDR notation.
ignoreip = 127.0.0.1/8 ::1 192.168.1.0/24
I like to set my ban time to one day. You can set this to anything you want but it is less secure if you set it to a shorter period of time. Uncomment the line below to make changes. You can ban IP addresses permanently by using a negative number.
bantime = 1d
You can set how many failures within a particular period will result in a ban. This is the ‘findtime’ and ‘maxretry’ options. By default Fail2ban will ban an attacker if the IP address fails to login five times in ten minutes. I leave these settings at the default values.
findtime = 10m

maxretry = 5
If you have to configured an SMTP mail server, you can get notification of attacks via email. Change to your email address.
destemail = root@localhost
You can have individual settings for each connection type. These are known as jails. If we wanted to use a more aggressive profile for our SSH monitoring, we can edit its jail.
Find the section called ‘[sshd]’, enable it and reduce the maximum amount of login attempts by adding these lines.
maxretry = 3

enable = true
We only want the SSH jail to be active, so ensure no other jails are active.
Now we have reduced the maximum login attempts from SSH from five to three. You can apply the same principle to other services on the Jails list.
Enable the Fail2ban service by typing:
sudo systemctl enable fail2ban
Start or restart Fail2ban for changes to take effect.
sudo systemctl start fail2ban

sudo systemctl restart fail2ban
You can use the Fail2ban client to perform additional tasks. It has many options that can be listed using this command:
fail2ban-client -h
You can check the jail status. This will inform you if there are any bans.
sudo fail2ban-client status sshd
If you want to unban an IP:
sudo fail2ban-client set sshd unbanip 23.34.45.56
Or ban an an IP:
sudo fail2ban-client set sshd banip 23.34.45.56
Remove Default Ubuntu Server User
YOu will have noticed when you installed your Ubuntu image for Raspberry Pi that you did not get an option to create the primary user. It is a good idea to not use the default user on a live server as an attacker would know the name of the default user in this image, leaving them only the password to guess. Let’s replace that user with a new user. This is probably overkill as provided you use a strong password then it does not really matter if someone knows your user name. Also, be aware that you will lose the typed command history in the terminal if you delete this user, as the history is stored per user.
Create a new user.
sudo adduser username
You will be prompted to give this user a password and personal details, so enter those.
We want this user to replace the default user, so we should give it administrative rights (the new user will still need to type the password for elevated permissions) by adding it to the sudo group.
sudo usermod -aG sudo username
We want to assign the new user to the same groups as the default user.
We should already be logged in as the ‘ubuntu’ user, so we can simply type this command to this user’s groups.
groups
Take a note of the groups. Now we can check the groups of our new user.
groups username
Assign each of the original user’s groups to our new user, except for the group created with the same name as the original user. In this case the group is called ‘ubuntu’. It will look something similar to this:
sudo usermod -aG adm,dialout,cdrom,floppy,sudo,audio,dip,video,plugdev,netdev,lxd username
Now log in with the new user and we can make changes to the original user.
If you want to keep the original user then we can simply remove some permissions, so they are not members of the same groups. This means that if someone logged in with this user they would have limited access to important directories. However, they could still use your root password once logged in, if they have it. State a group to remove the user from one at a time.
sudo gpasswd -d ubuntu groupname
It is probably safer to remove the original user, its home directory and files by logging in as your new user by typing:
sudo deluser --remove-home ubuntu
Conclusion
We have now reached the end of this rather lengthy tutorial. Thanks for sticking around to the end.
If you have any suggestions on how this tutorial can be improved then feel free to get in touch via the contact form on this website or via one of my social media channels.